
|
| Home Community Mys-Script Creative Off-Topic |
|
|||||||
 |
|
|
Thread Tools | Display Modes |
|
|
|
#1
 08-15-2017, 01:51 PM
|
||||
|
||||
|
Before I begin, special thanks to Digital and Hare over at TGL. I couldn't have done this without them! (Link to original discussion)
What this does: This addon will use Imagick (a.k.a ImageMagick) to layer multiple images, compress them into one, and display them wherever you'd like without using AJAX. This can be used for backgrounds, decors, or dynamically generated pets. (Great for breeding sites!) I recommend you read the entire tutorial and then tailor it to fit your needs rather than following along right away. -Getting the images ready- As an example, I have my pet's layers saved as separate, transparent png images. Make sure they appear on top of each other properly! Also make sure all of the images are the same size, don't crop them! This can easily be checked in any art/art editing program that allows layers (I use FireAlpaca). Then it's on to the folder structure. You can set in up in the picuploads folder. This is how mine looks: -Step 0- On x10host: Installing Imagick is easy for you. Just navigate to CPanel and find "select PHP version". Click on it and look for the "imagick" plugin (should be in the second column). Check the box, hit save, and you're done! (If you're not on x10, your host might have this too. If not, continue to the second option below) On XAMPP/Other hosts: Whether you're using a XAMPP server or a host that doesn't allow the above, follow this tutorial: Link. If not using XAMMP, make sure you search google on how to install imagick on your host before taking this route! It could be different based on your host. -Step 1- Navigate to phpMyAdmin and get some columns set up in owned_adoptables. Use consistent naming conventions! It will make your life 100% easier in the long run I promise you. For the sake of this tutorial, I'm going to use my column names and code as an example. Here are the new columns I made with the names:  -Step 2- Navigate back to the root folder and make a new php file to hold the Imagick code. (I called mine wolfimage.php) Inside, this is how it looks: PHP Code:
We're just about done! Don't believe me? Next I went to myadoptsview.php (called denview.php for me) and used this to get the image: PHP Code:
  -Finale- -Imagick and relative paths- Imagick for PHP 5.4 does not like relative paths, so absolute paths are required for it to work. I'm not sure if that's still the case with newer PHP versions. -Playing with Imagick- The markings images for my wolves are actually really messy and don't fit inside the lines. I fixed this by using COMPOSITE_DSTIN, which does it for me. (Yay, laziness! The reason the base itself doesn't completely fit in the lines is because I neglected to do so on the image itself, not because of imagick) To use your own filters, just poke around here and try them out to see which ones you like: Clicky. -Backslashes vs. Forwardslashes- If you use XAMPP/WAMPP like me, you'll have to use double backslashes. If you're operating online, then you use single forwardslashes like any other URL. -Need help tailoring?- Just let me know in the comments if things are going wrong. I can help you out with it.
__________________
Last edited by Dinocanid; 12-17-2017 at 05:08 PM. 
|
|
#3
08-17-2017, 03:01 PM
|
||||
|
||||
|
Interesting. Note Imagick is a PECL extension that is not available unless it is installed on the server. MysidiaHost has it since I installed Imagick extension for my server, but good chance on other webhosts like x10hosting you cannot do this. Wont be a problem if you run your VPS or Dedicated server though, you will be able to install Imagick yourself.
__________________
Mysidia Adoptables, a free and ever-improving script for aspiring adoptables/pets site.
|
|
#4
08-17-2017, 03:14 PM
|
||||
|
||||
|
X10 (free version; paid too I'm assuming) offers it along with some other plugins, but it has to be enabled. I'm not sure how it is for other hosts though.
__________________
Last edited by Dinocanid; 08-17-2017 at 06:52 PM.
|
|
#5
10-15-2017, 08:09 PM
|
||||
|
||||
|
I wonder how difficult it'd be to devise a generator/designer for users to use a drop-down or such to make custom pets :0
__________________
My Mods Site (1.3.4, 2020 Mods)
|
|
#6
10-15-2017, 08:27 PM
|
||||
|
||||
|
Actually....
 I can give info on how to do this if you want. The only problem with my current method is that I can't seem to have the dropdown make the current color the "active" option after submitting. So "black" would always be at the top of the base color dropdown list for example, even if the user chose "red". It'd be great if anyone figured out a way to fix that though.
__________________
|
|
#7
10-16-2017, 01:05 PM
|
||||
|
||||
|
Well okay then XD
If you could I would absolutely appreciate it! I love systems like that because you can make it easy for users to purchase custom pets (something I want to implement premium currency for lol) 
__________________
My Mods Site (1.3.4, 2020 Mods)
|
|
#8
10-16-2017, 02:21 PM
|
||||
|
||||
|
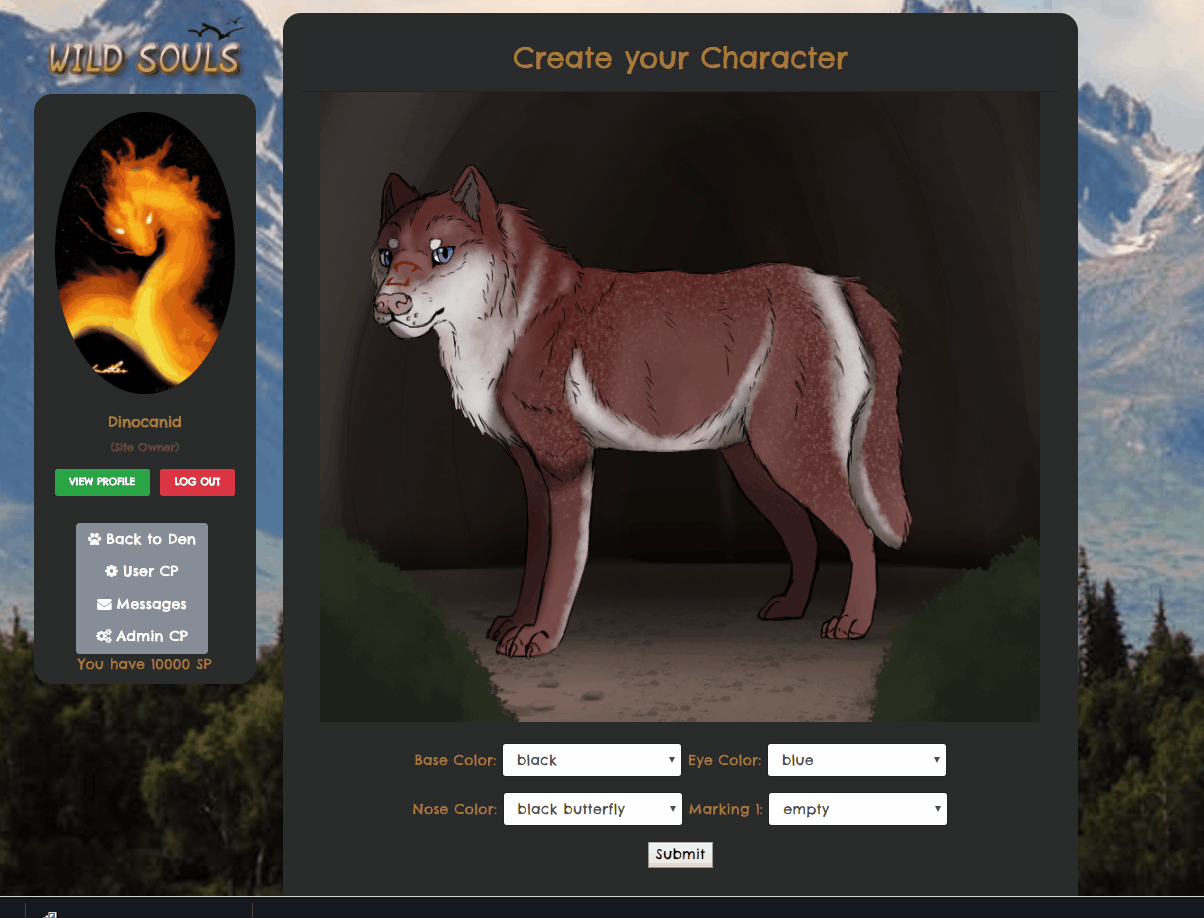
This is what I had on a page called "custompetgenerate.php". It holds the Imagick code:
PHP Code:
It isn't included here, but each user has a row generated when they register on the site; that row has default values to show a "blank" pet. PHP Code:
__________________
|
|
#9
10-16-2017, 05:27 PM
|
||||
|
||||
|
Thank you!!
So knowing how it saves in the database I think I can fix the drop-down selection problem. What needs to be done is modify the first (aka default) option to reflect what the user has listed in the database. It'll look sort of like this I think: HTML Code:
<option selected>{$selectedbase}</option> <option>black</option> <option>brown</option> <option>...and so on...</option> PHP Code:
And thank you again, Dinocanid!!!
__________________
My Mods Site (1.3.4, 2020 Mods)
|
|
#10
11-06-2017, 11:39 AM
|
||||
|
||||
|
OK, finally giving this a try (feeling slightly more confident than last week, though the breeding script edits will still be offloaded to you, haha. I'm afraid to touch that stuff yet).
edit: never mind, figured out first issue. Reading that TGL thread was very helpful. Still getting a blank image though. Syntax error maybe? I removed the composite_dstin bit 'cause that command isn't needed here. PHP Code:
Linearts are in the level folder: http://griffusion.elementfx.com/picu...h/f/5/line.png Sorry for the constant questions, haha. You've been amazingly helpful lately. Last edited by gwynmil; 11-06-2017 at 02:01 PM.
|
|
|
|

What's New? |
What's Hot? |
What's Popular? |


 Hybrid Mode
